
Complete Step-by-Step Tutorial with Troubleshooting & Performance Optimization
📋 Table of Contents
- Introduction: Why Upgrade Your FiveM Graphics?
- System Requirements & What You'll Need
- Quick Installation Method (5 Minutes)
- Advanced Installation Guide (Premium Graphics)
- Installing ReShade for Enhanced Visuals
- Installing NVE (Natural Vision Evolved)
- Sound Pack Installation Guide
- Graphics Settings Optimization
- Troubleshooting Common Issues
- Performance Tuning for Different PC Specs
- Recommended Graphics Packs
- FAQ & Quick Tips
🎮 Introduction: Why Upgrade Your FiveM Graphics?
Are you tired of the outdated, washed-out graphics in FiveM? Want your GTA 5 roleplay to look like a modern AAA title? You're in the right place!
What you'll achieve:
- ✨ Photorealistic textures and lighting
- 🌤️ Volumetric clouds and dynamic weather
- 🚗 Enhanced vehicle reflections and details
- 🌃 Customizable street light colors
- 📈 Optimized performance settings
Time required: 15-30 minutes
Skill level: Beginner-friendly
Cost: Free to $10/month (depending on pack choice)
📹 Video Tutorial
💻 System Requirements & What You'll Need
Minimum Requirements
| Component | Specification |
| OS | Windows 10/11 (64-bit) |
| CPU | Intel i5-4460 / AMD FX-8350 |
| RAM | 8GB (16GB recommended) |
| GPU | NVIDIA GTX 1050 / AMD RX 560 |
| Storage | 10-20GB free space |
| Internet | Required for downloads |
Recommended for Best Experience
| Component | Specification |
| CPU | Intel i7-8700K / AMD Ryzen 5 3600 |
| RAM | 16GB DDR4 |
| GPU | NVIDIA RTX 3060 / AMD RX 6700 XT |
| Storage | SSD with 25GB+ free space |
Required Software Checklist
- ✅ FiveM - Download from FiveM.net
- ✅ GTA 5 (Steam version) - Must own the game
- ✅ Graphics Pack - Free or paid (we'll cover options)
- ✅ ReShade (Optional) - ReShade.me
⚡ Quick Installation Method (5 Minutes)
Perfect for beginners who want instant results!
⚠️ Important: Make sure FiveM is closed before proceeding!
Step 1: Locate Your FiveM Application Data Folder
Method 1 (Recommended):
- Press Windows Key on your keyboard
- Type
FiveM - Right-click on FiveM → Select "Open file location"
- Right-click on FiveM shortcut again → Select "Open file location"
- Double-click the "FiveM Application Data" folder
Method 2 (Manual):
- Press Windows + R
- Type:
%localappdata%/FiveM - Press Enter
- Open "FiveM Application Data"

Step 2: Download a Graphics Pack
Where to find FREE graphics packs:
🎮 FiveM Mods Discord
| 🌐 Other Resources
|
What to look for when downloading:
- ✅ FiveM compatible (check description)
- ✅ Recent upload date (within last 6 months)
- ✅ Positive user reviews
- ✅ File size: 500MB - 5GB typically
Step 3: Install the Graphics Pack
💡 Pro Tip: Extract the ZIP file to your Desktop first for easy access!
For packs with a CITIZEN folder:
- Extract your downloaded ZIP file
- Open the extracted folder
- Locate the "citizen" folder inside
- Go to your FiveM Application Data folder
- DELETE the existing "citizen" folder
- Drag and drop the NEW "citizen" folder from your graphics pack
For packs with RPF files:
- In FiveM Application Data, create a "mods" folder (if it doesn't exist)
- Right-click → New → Folder → Name it
mods
- Right-click → New → Folder → Name it
- Drag any
.rpffiles from your graphics pack into this mods folder
For packs with PLUGINS folder:
- In FiveM Application Data, create a "plugins" folder (if needed)
- Drag the plugin files/folders into this directory
⚠️ Warning: Always backup your original folders before replacing them!
Step 4: Test Your Installation
- Launch FiveM
- Join any server (preferably a freeroam server for testing)
- Look around - notice the improved textures, lighting, and colors!
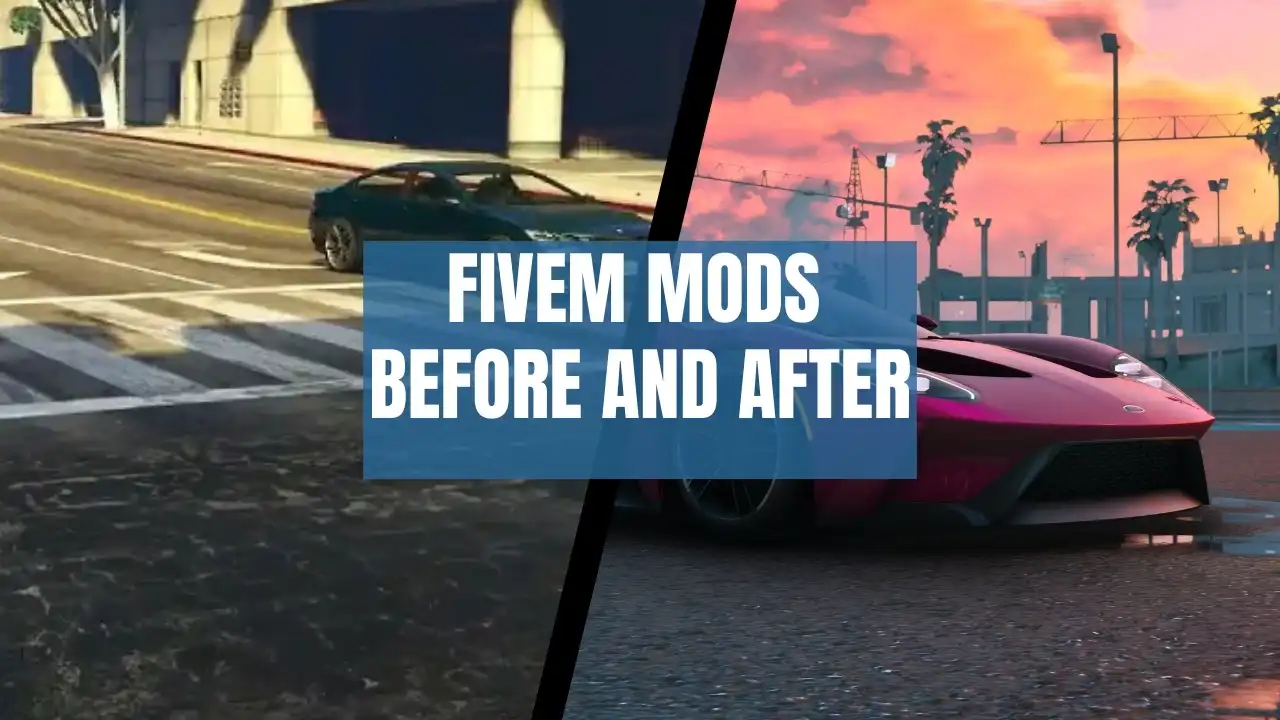
Before & After Comparison:
✅ Congratulations! Your basic graphics pack is installed! |
📹 Quick Installation Video Tutorial
Video Chapters:
- 0:00 - Introduction
- 0:30 - Finding FiveM folder
- 1:15 - Downloading graphics pack
- 2:00 - Installation process
- 3:30 - Testing in-game
- 4:45 - Quick tips
🔥 Advanced Installation Guide (Premium Graphics)
For users wanting the absolute best visuals with NVE, ReShade, and custom presets

What You'll Install:
🌟 NVE (Natural Vision Evolved)Premium graphics overhaul - $10/month |
🎨 ReShadePost-processing effects - FREE |
⚙️ Custom PresetsFine-tuned visual settings |
🔊 Sound PacksEnhanced audio (Optional) |
🎨 Installing ReShade for Enhanced Visuals
ReShade adds cinematic post-processing effects like depth of field, ambient occlusion, color grading, and ray-traced lighting simulation.

Step 1: Download ReShade
- Visit ReShade.me
- Click the large "Download" button
- Download ReShade 6.4.0 (or latest version)
- Save to your Downloads folder

Step 2: Prepare Your Downloads Folder
This ensures you can find the newest files easily
- Open File Explorer
- Go to Downloads folder
- Click "Sort" dropdown (top right)
- Select "Group by"
- Choose "None"
💡 Why do this? It removes date grouping and shows your newest downloads at the top!
Step 3: Run ReShade Installer
- Double-click the downloaded ReShade installer (
ReShade_Setup_X.X.X.exe) - If Windows SmartScreen appears, click "More info" → "Run anyway"
- Click "Yes" to allow changes
Step 4: Select FiveM Executable
- In the ReShade installer, click "Browse" or "Click here to select a game"
- Navigate to FiveM:
- Search for
FiveMin Windows search - Right-click FiveM → "Open file location"
- Right-click the FiveM shortcut again → "Open file location"
- You should now see FiveM.exe
- Search for
- Select FiveM.exe and click "Open"
⚠️ Common Mistake: Make sure you select
FiveM.exe, NOT the shortcut!
Step 5: Choose Rendering API
When asked to select a rendering API:
- Select "Direct3D 10/11/12"
- Click "Next"
Step 6: Select Effect Packages
- Click "Uncheck all" first (to clear any pre-selected items)
- Then click "Check all" (this ensures you get everything)
- Click "Next"
The installer will download shader packages (~200MB)
ℹ️ Note: This may take 2-5 minutes depending on your internet speed.
Step 7: Organize ReShade Files
After installation completes, you'll see new files in your FiveM directory.
Create a PLUGINS folder:
- Navigate to your FiveM installation folder (where FiveM.exe is located)
- Right-click in empty space → New → Folder
- Name it exactly:
plugins(lowercase, no spaces)
Move these files INTO the plugins folder:
reshade-shaders(folder)dxgi.dll(file)dxgi.log(file, if present)- Any
.inifiles related to ReShade
Step 8: Copy to FiveM Application Data
- Select the entire plugins folder you just created
- Copy it (Right-click → Copy, or Ctrl+C)
- Navigate to FiveM Application Data folder
- Paste the plugins folder here (Right-click → Paste, or Ctrl+V)
- If asked to replace, click "Replace"
Your folder structure should look like:
FiveM Application Data/
├── citizen/
├── mods/
├── plugins/
│   ├── reshade-shaders/
│   │   ├── Shaders/
│   │   └── Textures/
│   ├── dxgi.dll
│   └── dxgi.log
└── cache/
Step 9: Get Your Unique ReShade Code
| 🚨 CRITICAL STEP: This is ESSENTIAL for ReShade to work properly! |
- Launch FiveM
- Wait for it to fully load to the main menu
- Press F8 to open the console
- Scroll up until you see text like:
[add-ons] reshade unknown - a bug, a game crash
- Below that, you'll see a unique code:
+set reshade_allow "af7b3c92e1d4"
- COPY THIS ENTIRE LINE - Write it down in Notepad or take a screenshot
⚠️ Important: Every FiveM installation has a UNIQUE code. Never use someone else's code!
Step 10: Configure citizen.ini File
- Close FiveM completely (very important!)
- Navigate to:
FiveM Application Data → CitizenFX → citizen.ini
- Right-click
citizen.ini→ Open with → Notepad - Scroll to the very bottom of the file
- Press Enter twice to create blank lines
- Type or paste this configuration:
[ReShade] AllowFullScreen=1 PerformanceMode=0 - Press Enter once more and paste YOUR unique code from Step 9:
+set reshade_allow "YOUR_UNIQUE_CODE_HERE"
- Save the file (File → Save, or Ctrl+S)
- Close Notepad
Example of how it should look:
[Game]
IVPath=C:\Program Files\Rockstar Games\Grand Theft Auto V
Name=gta5

[ReShade]
AllowFullScreen=1
PerformanceMode=0
+set reshade_allow "af7b3c92e1d4"
Step 11: Test ReShade Installation
- Launch FiveM
- Join any server
- Once in-game, press INSERT key (or HOME key)
- The ReShade menu should appear!

✅ Success! ReShade is now installed and working! |
If the menu doesn't appear, see Troubleshooting Section
📹 ReShade Installation Video Tutorial
Video Chapters:
- 0:00 - Why use ReShade?
- 1:00 - Downloading ReShade
- 2:30 - Installation process
- 5:00 - Getting your unique code
- 7:00 - Configuring citizen.ini
- 9:00 - Testing in-game
- 10:30 - Using the ReShade menu
🌟 Installing NVE (Natural Vision Evolved)
NVE is the industry-standard graphics mod for FiveM, used by professional content creators and premium roleplay servers worldwide.

What is NVE?
Natural Vision Evolved Features:
Cost: $10/month subscription |
Step 1: Subscribe and Download NVE
- Visit the official NVE Patreon page
- Subscribe to the $10 tier
- Access the download links in your Patreon feed
- Download ALL required files:
- ✅ Main Package
- ✅ Optional Add-ons (your choice)
- ✅ Latest Updates
- Extract all files to your Desktop for easy access
💡 Tip: Create a folder on your Desktop called "NVE Files" to keep everything organized.
Step 2: Prepare FiveM Directory
- Navigate to FiveM Application Data
- Create these folders if they don't exist:
- Right-click → New → Folder → Name it
mods - Right-click → New → Folder → Name it
plugins
- Right-click → New → Folder → Name it
Your structure should look like:
FiveM Application Data/
├── citizen/
├── mods/ ← Create this if missing
├── plugins/ ← Create this if missing
└── cache/
Step 3: Install NVE Main Package
- On your Desktop, open the NVE Main Package folder
- Navigate to: Main Package → mods
- Select ALL files inside (Ctrl + A)
- Drag and drop into your FiveM mods folder
- Click "Replace" if prompted
⚠️ Note: This step may take 2-5 minutes as there are many files to copy.
Step 4: Install NVE Plugins
- In the NVE folder, go to: Main Package → plugins
- Drag all files to your DESKTOP temporarily (we'll move them later)
Step 5: Install Optional Add-ons
NVE includes optional enhancements that you can choose based on your preferences and PC performance.
Recommended add-ons:
☁️ Volumetric Clouds3D realistic clouds High impact | 🌤️ Enhanced WeatherBetter rain/fog effects Medium impact | 🚗 Vehicle ReflectionsBetter car shine Low impact |
To install add-ons:
- Open Optional Add-ons folder
- Choose which add-ons you want
- Open each add-on folder
- Drag shader files to your desktop (alongside the plugin files from Step 4)
Step 6: Move Everything to Plugins Folder
- Navigate to: FiveM Application Data → plugins
- Drag ALL files from your desktop into the plugins folder
- This includes NVE plugin files
- Plus any add-on files you chose
- Your plugins folder should now contain:
- ReShade files (from earlier installation)
- NVE plugin files
- Optional add-on files
Step 7: Install Volumetric Clouds (If Selected)
ℹ️ Note: Only do this step if you chose volumetric clouds in Step 5.
- Navigate to: FiveM Application Data → plugins → reshade-shaders → Shaders
- Find the file:
volumetric_clouds.fx(from your desktop/add-ons) - Copy this file into the Shaders folder
Step 8: Install ReShade Presets (Optional but Recommended)
Many creators provide custom ReShade presets optimized specifically for NVE.
To install presets:
- Download preset files (usually
.inifiles from Discord or Patreon) - Create a folder: FiveM Application Data → plugins → ReShade Presets
- Place all preset
.inifiles in this folder - In-game, you can easily switch between them
Step 9: Test NVE Installation
- Launch FiveM
- Join a server
- Look for these improvements:
- ✨ Dramatically improved lighting
- 🏢 Enhanced textures on buildings/roads
- ☁️ Volumetric clouds (if installed)
- 🚗 Better vehicle reflections
- 🌃 Richer colors and atmosphere
- Access NVE menu (usually opens automatically or press assigned key - often F7, F8, or F9)
✅ Congratulations! You now have premium NVE graphics!Your FiveM now looks like a modern AAA game! |
📹 NVE Installation Video Tutorial
Video Chapters:
- 0:00 - NVE Overview & Features
- 2:00 - Downloading from Patreon
- 4:00 - Main package installation
- 7:00 - Installing add-ons
- 10:00 - Volumetric clouds setup
- 13:00 - Testing in-game
- 15:00 - Performance optimization tips
🔊 Sound Pack Installation Guide
Enhance your immersion with high-quality sound packs that improve vehicle sounds, ambient audio, and weapon sounds.
Step 1: Locate GTA 5 Installation Directory
Via Steam (Recommended):
- Open Steam
- Go to Library
- Find Grand Theft Auto V
- Right-click on it
- Select Manage → Browse local files
This opens your GTA 5 installation folder.
Manual Method:
Default location is usually:
C:\Program Files (x86)\Steam\steamapps\common\Grand Theft Auto V
Step 2: Navigate to Sound Directory
From your GTA 5 folder:
- Open x64 folder
- Open audio folder
- Open sfx folder
Full path: GTA V/x64/audio/sfx
💾 Backup Tip: Before proceeding, copy the entire
sfxfolder to a safe location so you can restore original sounds if needed!
Step 3: Install Sound Pack
- Extract your downloaded sound pack
- Open the extracted sound pack folder
- Drag and drop all files into the
sfxfolder - Click "Replace files in destination" when Windows asks
- Wait for files to copy (may take 2-5 minutes depending on pack size)
Step 4: Test Sound Improvements
- Launch FiveM
- Join a server
- Spawn a vehicle
- Listen for:
- ✅ Enhanced engine sounds
- ✅ Realistic turbo whistles
- ✅ Better exhaust notes
- ✅ Improved ambient sounds
🔊 Your FiveM now sounds as good as it looks! |
⚙️ Graphics Settings Optimization
Now that everything is installed, let's optimize your settings for the best balance of quality and performance.
In-Game Graphics Settings
- Launch FiveM and join any server
- Press ESC → Settings → Graphics
🎯 The Most Important Setting: Render Resolution
Why Render Resolution MattersUpscaling internal game resolution beyond your monitor's native resolution creates sharper, clearer visuals - even on 1080p monitors! Example: Playing at 4K resolution on a 1080p monitor = dramatically better image quality |
How to configure:
- Find "Render Resolution" in Graphics settings
- Choose based on your monitor:
| Your Monitor | Try This Resolution | Quality Gain |
|---|---|---|
| 1080p (1920x1080) | 2560x1440 (2K) | ⭐⭐⭐⭐ |
| 1080p (High-end GPU) | 3840x2160 (4K) | ⭐⭐⭐⭐⭐ |
| 1440p (2560x1440) | 3840x2160 (4K) | ⭐⭐⭐⭐ |
| 4K (3840x2160) | 5120x2880 or higher | ⭐⭐⭐ |
- Apply and test:
- Click Apply
- Check your FPS
- If FPS drops below 30, lower the setting one step
⚠️ Performance Warning: Higher render resolution significantly impacts FPS. Start with 2K and adjust based on performance.
Recommended Graphics Settings by PC Type
For High-End PCs (RTX 3060+, RX 6700 XT+):
Render Resolution: 4K (3840x2160)
Texture Quality: Very High
Shader Quality: Very High
Shadow Quality: Very High
Reflection Quality: Ultra
Water Quality: Very High
Grass Quality: Ultra
MSAA: Off (use FXAA instead)
Post FX: Very High
Anisotropic Filtering: x16
Expected FPS: 60-90 FPS |
For Mid-Range PCs (GTX 1660, RX 5600 XT):
Render Resolution: 2K (2560x1440)
Texture Quality: High
Shader Quality: High
Shadow Quality: High
Reflection Quality: High
Water Quality: High
Grass Quality: High
MSAA: Off
Post FX: High
Anisotropic Filtering: x8
Expected FPS: 50-75 FPS |
For Low-End PCs (GTX 1050, RX 560):
Render Resolution: Native (1920x1080)
Texture Quality: Normal
Shader Quality: Normal
Shadow Quality: Normal
Reflection Quality: Normal
Water Quality: High
Grass Quality: Normal
MSAA: Off
Post FX: Normal
Anisotropic Filtering: x4
Expected FPS: 40-60 FPS |
🎮 Using ReShade In-Game
Opening ReShade Menu:
- Press INSERT key (default)
- Or press HOME key (if you changed it)

Navigating the Menu:
1. Select a Preset:
2. Popular Preset Types:
|
Toggling ReShade On/Off:
- Press SCROLL LOCK (or your configured hotkey)
- Useful for comparing graphics before/after
🌟 NVE In-Game Menu & Customization
Access NVE's powerful customization options to fine-tune your graphics:
Opening NVE Menu:
- Usually F7, F8, or F9 (check your installation)
- Menu appears on-screen
☁️ Cloud Settings
Volumetric Cloud Options:
|
💡 Pro Tip: Low quality volumetric clouds still look amazing from ground level and save significant FPS!
🎨 Graphics Options
Motion Blur Settings:
If you installed NVE, you'll notice motion blur when moving.
Adjusting Motion Blur:
Recommendations:
|
🌃 Street Light Colors (Fan Favorite Feature!)
One of NVE's most loved features - customize the color of street lights across the city!
How to Change Street Lights:
|
🎮 Try This: Teal street lights + motion blur = authentic Need for Speed atmosphere!
🚗 Vehicle Light Settings
Fine-tune ALL vehicle lighting for perfect brightness:
| Light Type | What It Controls | Recommended |
|---|---|---|
| Headlights | Main headlight brightness (day/night) | 1.0 - 1.5x |
| Tail Lights | Rear light brightness | 0.8 - 1.2x |
| Brake Lights | When braking | 1.0 - 1.3x |
| Reverse Lights | When in reverse | 1.2 - 1.5x |
| Indicators | Turn signals | 0.9 - 1.1x |
| Police Lights | Emergency vehicle lights | 1.5 - 2.0x |
⚙️ Tip: Day and night multipliers are separate, so you can have brighter headlights at night and dimmer during day!
📹 Settings Optimization Video Tutorial
Video Chapters:
- 0:00 - Settings overview
- 2:00 - Render resolution explained
- 4:00 - PC-specific recommendations
- 6:00 - ReShade menu guide
- 9:00 - NVE customization walkthrough
- 12:00 - Performance testing results
🛠️ Troubleshooting Common Issues
Even with careful installation, issues can occur. Here's how to fix the most common problems:
Issue #1: ReShade Not Loading / Menu Won't Open
Symptoms:
|
✅ Solution 1: Verify File Locations
Check that files are in the correct place:
FiveM Application Data/plugins/
├── dxgi.dll ✓
├── reshade-shaders/ ✓
│   ├── Shaders/
│   └── Textures/
└── *.ini files ✓
✅ Solution 2: Check citizen.ini Configuration
- Navigate to:
FiveM Application Data/CitizenFX/citizen.ini - Open with Notepad
- Verify your unique code is present at the bottom:
+set reshade_allow "YOUR_CODE_HERE"
- Ensure no typos or extra spaces
- Save and restart FiveM
✅ Solution 3: Regenerate ReShade Code
- Delete all ReShade files from plugins folder
- Reinstall ReShade completely (follow ReShade installation steps)
- Get NEW code from F8 console
- Update citizen.ini with the new code
✅ Solution 4: Check for Antivirus Interference
Windows Defender may block dxgi.dll:
- Open Windows Security
- Go to Virus & threat protection
- Click Manage settings
- Scroll to Exclusions
- Click Add or remove exclusions
- Add your FiveM folder
- Restart PC
Issue #2: Game Crashes on Startup
Symptoms:
|
✅ Solution 1: Remove Mods Temporarily
Identify which mod is causing the crash:
- Navigate to FiveM Application Data
- Rename folders (don't delete yet):
mods→mods_backupplugins→plugins_backupcitizen→citizen_backup
- Launch FiveM
- If it works, add folders back one at a time to find the problem
✅ Solution 2: Clear FiveM Cache
- Navigate to:
FiveM Application Data/cache - Delete ALL contents inside the cache folder
- Restart FiveM (cache will rebuild automatically)
ℹ️ Note: Clearing cache is safe and often fixes many issues!
✅ Solution 3: Verify GTA 5 Files
- Open Steam
- Go to Library
- Right-click Grand Theft Auto V
- Select Properties
- Go to Local Files tab
- Click "Verify integrity of game files"
- Wait for completion (may take 5-10 minutes)
- Restart Steam and FiveM
✅ Solution 4: Check for Mod Conflicts
⚠️ Important: Only use ONE complete graphics pack at a time!
Common conflicts:
- Multiple graphics packs installed
- Old NVE + new NVE
- Mixing QuantV with NVE
- Outdated ReShade versions
Fix: Remove all graphics mods and install just ONE pack fresh.
Issue #3: Low FPS / Performance Issues
Symptoms:
|
✅ Solution 1: Lower Render Resolution (BIGGEST FPS GAIN!)
This single setting can give you 20-40 FPS boost:
Current: 4K (3840x2160)
Try: 2K (2560x1440) = +20-30 FPS
Then: Native (1920x1080) = +30-40 FPS
✅ Solution 2: Use Performance ReShade Preset
- Press INSERT to open ReShade
- Switch from "RT" to "Non-RT" preset
- Disable heavy effects:
- Ray tracing
- Ambient Occlusion (MXAO/SSAO)
- Depth of Field
- Motion Blur
✅ Solution 3: Reduce NVE Effects
In NVE menu:
- Motion blur: Set to 0 or disable
- Cloud quality: Change to "Low" or disable
- Volumetric clouds: Disable if installed
- Vehicle light multipliers: Reduce to 1.0
✅ Solution 4: Optimize GTA Settings
| Setting | Change To | FPS Gain |
|---|---|---|
| Grass Quality | Normal or Low | +10-15 FPS |
| Reflection Quality | High → Normal | +5-10 FPS |
| Shadow Quality | High → Normal | +8-12 FPS |
| MSAA | OFF (use FXAA) | +15-20 FPS |
| Extended Distance | Reduce slider | +5-8 FPS |
✅ Solution 5: Close Background Apps
Common FPS Killers:
How to close:
|
✅ Solution 6: Windows Optimizations
Enable Game Mode:
- Press Windows + I (Settings)
- Go to Gaming
- Click Game Mode
- Turn ON
Set FiveM to High Priority:
- Open Task Manager (Ctrl + Shift + Esc)
- Go to Details tab
- Find FiveM.exe
- Right-click → Set Priority → High
Update GPU Drivers:
- NVIDIA: Use GeForce Experience
- AMD: Use AMD Software (Adrenalin)
Issue #4: Textures Look Blurry or Low Quality
Symptoms:
|
✅ Solution 1: Check Texture Pack Installation
Verify files are in the correct location:
FiveM Application Data/citizen/
Should contain updated texture files (not empty!)
✅ Solution 2: Verify RPF Files in Mods Folder
FiveM Application Data/mods/
Should contain .rpf files from your graphics pack
If empty or missing, reinstall the graphics pack.
✅ Solution 3: Increase Texture Quality
- In-game, press ESC
- Settings → Graphics
- Texture Quality: Set to Very High
- Click Apply
- Restart the game
✅ Solution 4: Clear Texture Cache
- Exit FiveM completely
- Navigate to:
FiveM Application Data/cache - Delete:
game_storagefolder - Restart FiveM (will rebuild cache)
✅ Solution 5: Reinstall Graphics Pack
Sometimes files corrupt during extraction:
- Delete current graphics pack files
- Re-download from source
- Extract with different program (try 7-Zip or WinRAR)
- Install fresh
📹 Complete Troubleshooting Video
Video Chapters:
- 0:00 - Introduction
- 1:00 - ReShade not loading fixes
- 3:00 - Game crash solutions
- 5:00 - Performance problems
- 8:00 - Texture quality issues
- 10:00 - Code errors
- 12:00 - Advanced troubleshooting
⚡ Performance Tuning for Different PC Specs
Get the absolute best graphics your specific PC can handle with these optimized configurations.
🖥️ Low-End PC Configuration
Hardware Specs:
Expected FPS: 40-60 FPS |
Recommended GTA Graphics Settings:
Render Resolution: 1920x1080 (Native)
Texture Quality: High
Shader Quality: Normal
Shadow Quality: Normal
Reflection Quality: Normal
Water Quality: Normal
Grass Quality: Low
Particles Quality: Normal
Tessellation: Off
Post FX: Normal
MSAA: Off
FXAA: On
Anisotropic Filtering: x4
ReShade Settings:
- ✅ Use "Performance" or "Lite" presets ONLY
- ❌ Disable:
- Ray tracing
- Ambient Occlusion
- Depth of Field
- Motion Blur
- MXAO
NVE Settings:
- Cloud Quality: Low or disabled
- Motion Blur: Off
- Volumetric Clouds: Disabled
💻 Mid-Range PC Configuration
Hardware Specs:
Expected FPS: 50-75 FPS |
Recommended GTA Graphics Settings:
Render Resolution: 2560x1440 (2K)
Texture Quality: Very High
Shader Quality: High
Shadow Quality: High
Reflection Quality: High
Water Quality: Very High
Grass Quality: High
Particles Quality: High
Tessellation: Normal
Post FX: Very High
MSAA: Off
FXAA: On
Anisotropic Filtering: x8
ReShade Settings:
- ✅ Use "Non-RT" presets
- ✅ Enable moderate effects:
- LumaSharpen
- Vibrance
- Clarity
- SMAA
- ❌ Avoid RT (Ray-Traced) presets
NVE Settings:
- Cloud Quality: Medium
- Motion Blur: 40-50% (vehicles only)
- Volumetric Clouds: Low Quality
🚀 High-End PC Configuration
Hardware Specs:
Expected FPS: 60-90 FPS |
Recommended GTA Graphics Settings:
Render Resolution: 3840x2160 (4K)
Texture Quality: Very High
Shader Quality: Very High
Shadow Quality: Very High
Reflection Quality: Ultra
Water Quality: Very High
Grass Quality: Ultra
Particles Quality: Very High
Tessellation: Very High
Post FX: Ultra
MSAA: Off
FXAA: On
Anisotropic Filtering: x16
ReShade Settings:
- ✅ Use full "RT" (Ray-Traced) presets
- ✅ Enable all effects including:
- RT Global Illumination
- Ambient Occlusion
- Depth of Field
- Motion Blur
- Film Grain
- Color Grading
NVE Settings:
- Cloud Quality: High
- Motion Blur: 60-80%
- Volumetric Clouds: High Quality
- All add-ons: Enabled
🏆 Ultra Enthusiast Configuration
Hardware Specs:
Expected FPS: 60-120+ FPS |
Recommended Settings:
Render Resolution: 5K-8K (maximum available)
All Settings: Maximum/Ultra
Advanced Graphics: All enabled
Extended Distance Scaling: Maximum
ReShade: Maximum quality RT presets with all effects
NVE: Everything maxed, all add-ons installed
📊 FPS Boost Tips for ALL PCs
1. Disable Windows Game DVRSettings → Gaming → Captures Turn OFF: "Record in background while I'm playing" 2. Set Power Plan to High PerformanceControl Panel → Power Options → High Performance 3. Disable Fullscreen Optimizations
4. Increase Virtual MemorySystem → Advanced → Performance Settings Advanced → Virtual Memory → Change Set to: 16GB (initial) 32GB (maximum) 5. Clean Temp Files
6. Disable Unnecessary Startup ProgramsTask Manager → Startup tab Disable programs you don't need |
📈 Performance Comparison Chart
| PC Type | Render Res | Settings | Expected FPS | Visual Quality |
|---|---|---|---|---|
| Low-End | 1080p | Normal-High | 40-60 | ⭐⭐⭐ |
| Mid-Range | 2K | High-Very High | 50-75 | ⭐⭐⭐⭐ |
| High-End | 4K | Very High-Ultra | 60-90 | ⭐⭐⭐⭐⭐ |
| Ultra | 4K-8K | Maximum | 60-120+ | ⭐⭐⭐⭐⭐+ |
📹 Performance Optimization Video
Video Chapters:
- 0:00 - PC spec overview
- 2:00 - Settings for each tier
- 5:00 - Windows optimizations
- 8:00 - NVIDIA/AMD control panel settings
- 11:00 - Testing and results
- 14:00 - Before/after comparison charts
🎨 Recommended Graphics Packs
Not sure which graphics pack to choose? Here are the best options for different needs and budgets.
🆓 Best FREE Graphics Packs
1. QuantV LiteQuality: ⭐⭐⭐⭐ (4/5) Features:
Download: FiveM Forums | 2. Project RebornQuality: ⭐⭐⭐⭐ (4/5) Features:
Download: Discord communities |
3. Simple Realism PackQuality: ⭐⭐⭐½ (3.5/5) Features:
Download: GTA5-Mods.com |
💰 Best PAID Graphics Packs
1. NVE (Natural Vision Evolved) - $10/monthQuality: ⭐⭐⭐⭐⭐ (5/5) Features:
|
🏆 Top Picks by Category
| Category | Winner | Why? |
|---|---|---|
| 🥇 Best Overall | NVE | Worth every penny for serious players |
| 🥈 Best Free | QuantV Lite | Great quality without cost |
| 🥉 Best Performance | Simple Realism | Minimal FPS impact |
| 🎬 Best for Content Creation | NVE with RT | Professional-grade visuals |
| 🎭 Best for RP Servers | NVE | Used by top RP servers worldwide |
| 💵 Best Value | NVE | $10/month for premium features |
📊 Graphics Pack Comparison Visual
📹 Graphics Pack Comparison Video
Video Chapters:
- 0:00 - Introduction
- 2:00 - Free pack showcase
- 6:00 - Paid pack showcase
- 10:00 - Side-by-side comparisons
- 13:00 - Performance testing
- 16:00 - Final recommendations
❓ FAQ & Quick Tips
Frequently Asked Questions
Q: Can I use multiple graphics packs together? |
Q: Will graphics mods get me banned from servers? |
Q: Do I need ReShade for NVE? |
Q: Can I use these on any FiveM server? |
Q: Will this improve my FPS? |
Q: How much storage space do I need? |
Q: Can I switch between presets easily? |
Q: Is NVE worth $10/month? |
Q: Do graphics packs work with GTA Online? |
Q: Can I create my own ReShade presets? |
💡 Pro Tips
1. Take Before/After Screenshots
|
2. Join Graphics Pack Discord Servers
|
3. Always Backup Everything
|
4. Update Regularly
|
5. Experiment with Settings
|
🚀 Quick Start Checklist
Before you begin:
- [ ] FiveM installed and working
- [ ] GTA 5 installed on Steam
- [ ] At least 10GB free storage
- [ ] Graphics pack downloaded
- [ ] ReShade downloaded (if using)
- [ ] Backup of original files
- [ ] Discord server joined (for support)
- [ ] This guide bookmarked
During installation:
- [ ] Follow steps in exact order
- [ ] Don't skip verification steps
- [ ] Test after each major change
- [ ] Save your unique ReShade code
- [ ] Screenshot working settings
After installation:
- [ ] Test graphics in-game
- [ ] Check FPS performance
- [ ] Adjust settings if needed
- [ ] Save preset preferences
- [ ] Join server and enjoy!
📱 Quick Reference Commands
=== LOCATIONS === FiveM App Data: %localappdata%/FiveM/FiveM Application Data GTA 5 Sounds: GTA V/x64/audio/sfx citizen.ini: FiveM App Data/CitizenFX/citizen.ini === HOTKEYS === ReShade Menu: INSERT or HOME NVE Menu: F7, F8, or F9 (varies) Console: F8 Toggle ReShade: SCROLL LOCK === FOLDERS NEEDED === FiveM Application Data/ ├── citizen/ ├── mods/ ├── plugins/ └── cache/ |
🎬 Complete Video Tutorial Series
Full Playlist: "FiveM Graphics Master Class"
Individual Tutorial Videos:
- Quick Install (5 min) - For beginners, basic graphics pack only
- ReShade Setup (15 min) - Complete ReShade installation guide
- NVE Installation (20 min) - Full NVE setup with add-ons
- Settings Optimization (12 min) - Finding perfect settings for your PC
- Troubleshooting (25 min) - Fixing all common issues
📚 Additional Resources
Official Sites:
- FiveM.net - Download FiveM
- ReShade.me - Download ReShade
- NVE Patreon - Subscribe to NVE
Community Resources:
- FiveM Forums - Discussion and support
- FiveM Mods Discord - Free graphics packs
- Reddit r/FiveM - Community help
- GTA5-Mods.com - Mod repository
Tools:
- MSI Afterburner - FPS monitoring
- GPU-Z - Hardware monitoring
- RivaTuner - FPS limiter
🎯 Final Thoughts
Congratulations! 🎉You now know how to transform your FiveM from basic to breathtaking! Whether you chose free packs for subtle improvements or invested in NVE for professional-grade visuals, you're equipped with everything you need. |
Remember the key principles:
- ✅ Start simple, add complexity gradually
- ✅ Performance matters - adjust settings to YOUR PC
- ✅ Join communities for ongoing support
- ✅ Keep mods updated for best compatibility
- ✅ Have fun and enjoy your enhanced FiveM experience!
👍 Did This Guide Help You?
If you found this tutorial useful:
Have questions? Drop them in the comments below - we're here to help! |
🎮 Enjoy your stunning new graphics! Last Updated: December 2025 |
This guide is regularly updated with the latest information. Bookmark it for future reference!